IoT Electric Imp monitoring with Zabbix and Grafana - Part 2
 The Electric Imp range of IoT devices offer a simple means to interface with a number of different physical data collection devices and connect back to a central controlling Server Platform via built-in WiFi. Code can be written and deployed from the central Server Platform that controls how the collected data is made available.

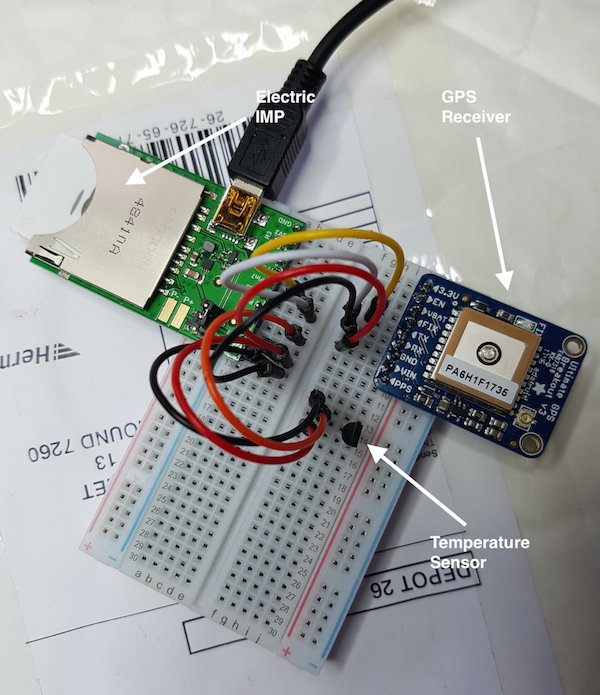
My original article on the Imp was based on a simple implementation that just used the internal light sensor in an Electric Imp passing back data via Cloud Servers to Zabbix and visualising on a Grafana Dashboard. Using the same infrastructure of the Imp, the central Cloud Servers, Zabbix and Grafana, I extended the data collection capabilities by adding a temperature sensor and GPS receiver.

Interestingly, when you put all this together there are no external electronic components as it's all constructed from the Imp itself and the sensors which are just wired together. In the above picture this is done using a "Breadboard" with fly leads but this could easily be constructed in a case with battery power.
The Grafana Dashboard was also extended to show the temperature and GPS data. The position from the GPS receiver is also showed on a map.

FreePBX/Asterisk on an Amazon Ubuntu Lightsail instance
I needed to install Asterisk 13.10, FreePBX 14.0 on Ubuntu 16.04 LTS in an Amazon Lightsail instance. I based the installation process on a set of installation notes on the FreePBX site but this was based on Ubuntu 14.04 LTS on bare metal. Ubuntu 16.04 needed a few changes to the procedure which was further complicated by the Amazon Lightsail customised image. So the following takes into account these requirements. Its not been fully tested yet but does install and run. The Lightsail instances was 2GB RAM 40GB Disk and a static IP. After each login, I use sudo to get the system into root mode. There will be people out there that tut tut at me for that!
Step 1 - Added a swap file and get Ubuntu up to date.
sudo -i
fallocate -l 4g /swap
chmod 600 /swap
mkswap /swap
swapon /swap
echo '/swap swap swap 0 0' | tee -a /etc/fstab
apt update
apt upgrade -y
(keep the local menu.lst for grub, prompts twice)
reboot
Step 2 - Install a bunch of pre-requisites. This includes PHP 5.6 which FreePBX 13 needs (module updates will not work with PHP 7 installed) hense the use of an external repository.
sudo -i
add-apt-repository ppa:ondrej/php
apt update
apt-get install -y build-essential apache2 mysql-server mysql-client\
bison flex php5.6 php5.6-curl php5.6-cli php5.6-mysql php-pear php5.6-gd php5.6-mbstring php5.6-xml sox\
libncurses5-dev libssl-dev libmysqlclient-dev mpg123 libxml2-dev libnewt-dev sqlite3\
libsqlite3-dev pkg-config automake libtool autoconf unixodbc-dev uuid uuid-dev\
libasound2-dev libogg-dev libvorbis-dev libcurl4-openssl-dev libical-dev libneon27-dev libsrtp0-dev\
libspandsp-dev libiksemel3 libapache2-mod-php5.6 exim4
(you will prompted three times for a MySQL root password, leave it blank and tab to “ok” and press enter)
cat >> /etc/mysql/conf.d/mysqld.cnf << EOF
[mysqld]
sql_mode = "NO_ENGINE_SUBSTITUTION"
EOF
service mysql restart
(The above sets the MySQL mode to be compatible with previous MySQL versions, not STRICT)
Step 3 - Install some more required packages with versions that are not in the standard Ubuntu repository. nodejs 6 and a version of libmyodbc that works.
curl -sL https://deb.nodesource.com/setup_6.x -o nodesource_setup.sh
bash nodesource_setup.sh
apt-get install -y nodejs
wget https://dev.mysql.com/get/Downloads/Connector-ODBC/5.3/mysql-connector-odbc-5.3.10-linux-ubuntu17.04-x86-64bit.tar.gz
gunzip mysql-connector-odbc-5.3.10-linux-ubuntu17.04-x86-64bit.tar.gz
tar xvf mysql-connector-odbc-5.3.10-linux-ubuntu17.04-x86-64bit.tar
cd mysql-connector-odbc-5.3.10-linux-ubuntu17.04-x86-64bit
cp bin/* /usr/local/bin
cp lib/* /usr/local/lib
myodbc-installer -a -d -n "MySQL ODBC 5.3 Driver" -t "Driver=/usr/local/lib/libmyodbc5a.so"
reboot
Step 4 - Asterisk (with some config file adjustments) and FreePBX.
sudo -i
apt install asterisk -y
service asterisk stop
chown asterisk. /var/run/asterisk
chown -R asterisk. /etc/asterisk
chown -R asterisk. /var/{lib,log,spool}/asterisk
chown -R asterisk. /usr/lib/asterisk
sed -i 's/(!)//' /etc/asterisk/asterisk.conf
sed -i 's/\(^upload_max_filesize = \).*/\1256M/' /etc/php/5.6/cli/php.ini
sed -i 's/\(^memory_limit = \).*/\1256M/' /etc/php/5.6/cli/php.ini
a2enmod rewrite
rm -rf /var/www/html
cp /etc/apache2/apache2.conf /etc/apache2/apache2.conf_orig
sed -i 's/^\(User\|Group\).*/\1 asterisk/' /etc/apache2/apache2.conf
sed -i 's/AllowOverride None/AllowOverride All/' /etc/apache2/apache2.conf
service apache2 restart
cat >> /etc/odbc.ini << EOF
[MySQL-asteriskcdrdb]
Description=MySQL connection to 'asteriskcdrdb' database
driver=MySQL
server=localhost
database=asteriskcdrdb
Port=3306
Socket=/var/run/mysqld/mysqld.sock
option=3
EOF
wget http://mirror.freepbx.org/modules/packages/freepbx/freepbx-14.0-latest.tgz
tar vxfz freepbx-14.0-latest.tgz
cd freepbx
./start_asterisk start
./install -n
rebootUsing Zabbix and Grafana to BitCoin BlockChain Stats
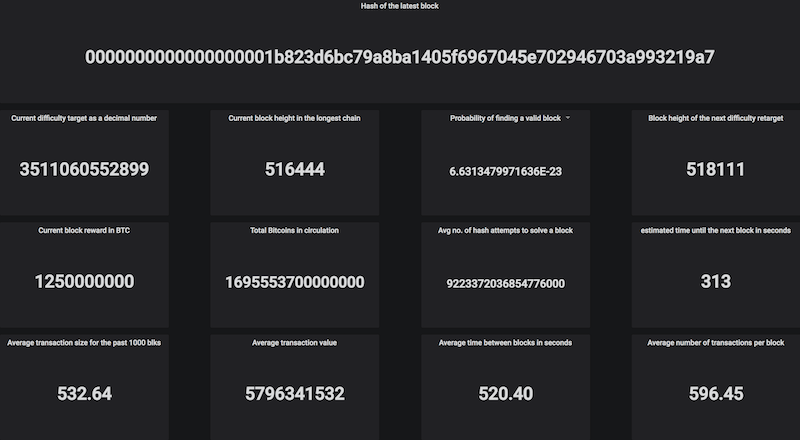
 I wanted to get a few BitCoin BlockChain Stats to show on a Grafana Dashboard without having to install and run a whole bunch of code. Luckily blockchain.info provide a simple REST web interface for this.
The next step was to get the data needed from blockchain.info. A simple PHP script was used to get this data, format it and use the Zabbix Sender (zabbix_sender) to post it into a Zabbix Server. I organised the Zabbix data using a single Zabbix host with a few Zabbix items (which must be created as "Zabbix trapper" item type) to hold the data. The PHP script is run on a Zabbix Server (just for convenience really) under cron every 60 seconds.
Finally I created a simple Grafana Dashboard using "Single Value" panels to show the data.

